|
WORKROOM CUTTING TECHNIQUES -
Introduction:
There are many different
methods of cutting fabrics for sewing. While we each have a favorite method,
it is extremely important to be aware of all of the techniques and their special
applications. Custom work means adapting to different patterns, designs
and fabrics. This adaptability must extend to the very first step of the
fabrication process, cutting the fabric.
Before we can discuss cutting techniques, it is important to understand the
construction of fabrics. We rarely deal with knit or stretchy fabrics,
so the primary focus here will be on woven fabrics. The process of weaving
involves stretching the warp threads, the vertical threads, tight. The
weft or woof are the filling threads which run horizontally and are used to
bind the warp threads on the ends to create the selvage. The warp and
weft lines of the fabric are referred to as grain lines or straight of grain.
The weaving process, when done properly, should produce a fabric length
which is perfectly squared - the warp and weft are perpendicular to
each other. However, the action of rolling the fabric lengths
through the dying, printing and sealing processes often pull the fabric
out of square. The machines pull just a bit harder on one side than the
other thereby pulling one end of the weft threads ahead faster than the
other end. The fabric is not square.
Do not confuse straight
of grain with blocking/squaring. The warp and weft lines are straight of grain.
They can be pulled out of alignment during processing causing the fabric to
be out of square. The fabric can be cut along the grain line and squared using
a blocking technique. However, when the pattern is printed on the fabric while
it is out of square, we say the pattern is printed off the grain line. You can
cut the fabric along the grain line and square it, but the pattern on the fabric
will always be off grain.
The techniques for cutting
fabric listed below begin with cutting following the straight of grain. This
is always the best method to follow whenever possible because the fabrics themselves
try to revert to straight of grain when hanging. However, subsequent techniques
help you adapt to patterns on the fabric which are printed off square.
Cutting Techniques:
Straight of Grain.
This process involves
cutting the fabric following the weft thread horizontally across the width
of the fabric. Ideally, all square cuts should follow the straight of grain.
This eliminates ripples and sagging in the finished product and the entire
fabrication process is easier because of your confidence that the fabric
is square. There are five techniques to use:
| Woven
horizontal lines:
If the pattern
of the fabric has a woven horizontal line - not a printed on top
horizontal line - you can cut the fabric following that horizontal
line. This is the easiest method by which to cut on the straight
of grain
|
 |
Sighting.
If the weft
thread is large enough, you can often cut the width just by following
the thread with your eyes
|
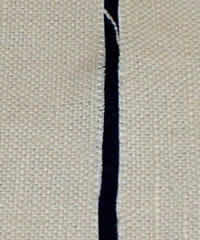 |
Pulling
threads.
Snip thru the
selvage. Loosen a piece of the weft thread and gently pull on it.
Depending on how loosely the fabric is woven and how strong the
weft thread is, you may be able to pull anywhere from two inches
to most of the width of the fabric. As the thread is pulled, it
will cause a puckering effect along the weft line.
|
 |
As the thread
is pulled free, it will often leave a gap line. Once the thread
breaks, cut along the pucker and/or gap line as far as you can.
If possible, use the slicing technique to continue your cut line
just a little farther past the pull line. Select a thread and pull
again, continuing the process across the width of the fabric.
- Tips:
- Place
sheer fabrics on a dark surface or brown kraft paper to see
the pull line easier.
- If the
pull line does not show on the face of the fabric, turn it
over. Often the pull line will show better on the back
of the fabric
|
Slicing
A very sharp
pair of scissors will slice through the warp threads easily while
following a weft thread across the width of fabric. Open your scissors
part way to find the sharpest spot. Use your alternate hand to hold
the cut fabric down taut behind the scissors as you gently push
the scissors along the width of the fabric. With practice, you will
be able to feel when the scissors catch as they cut thru the weft
thread - thereby warning you to slow down or stop and adjust your
fabric to continue.
|
|
Ripping.
This technique
is recommended only when the warp threads are very weak. Snip thru
the selvage of the fabric. In short sharp bursts, tug the two sides
of the fabric away from each other. Do not try to rip in one long
motion. This technique should not be used if the ripped edge becomes
too stretched out and rippled.
|
 |
To date, there
are only two fabrics I have found which can be ripped easily.
They are the Roc Lon Rain No Stain lining and lightweight interlining.
|
|
Follow the pattern.
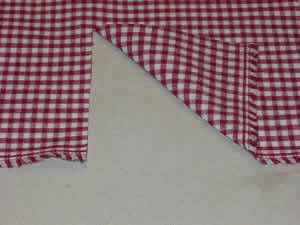
Plaids & checks.
If the pattern
has a definite horizontal line, simply cut along that line. If the
printed pattern is severely off grain, over 2", decide if the
treatment design will accomodate this fabric. Roman shades, especially,
need to be cut as close to straight of grain as possible. Once a
piece is cut, if the cutting line is not square, you can block/straighten
the fabric piece using the same method of blocking a piece cut on
the straight of grain.
|
|
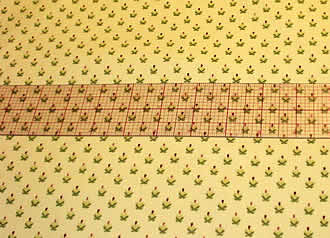
Floral or all-over
patterns.
Spread the width
of the fabric across the table. Align at least one edge of the fabric
along the straight edge of the table. Smooth the fabric to eliminate
any stretched or puckered areas. Determine a point on the pattern
which repeats across the width of the fabric. Draw a line from one
point to the next. Use the straightedge to continue the line to
the selvege edge. Cut along that line.
|
 |
Square the fabric to
a straight edge.
This technique requires
a professional workroom table. This table is typically five feet wide and
eight or more feet long. It is covered with padding and canvas and bound
on the sides with a rule strip. Horizontal lines are drawn on the table
in one inch increments. Often, vertical lines are also drawn, creating a
one inch grid over the entire surface of the table. Fabric is laid out flat
on this table with both selvage edges aligned with the edges of the table.
Some workrooms use a 60 inch ruler to draw a line horizontally across the
fabric from one ruled side to the other. Other workrooms use a large T-
or L- square to draw the horizontal cutting line. You can also ‘peel
back’ the fabric as you cut, simply following a horizontal line drawn
on the table.
Measure from the selvage
edge.
When railroading fabrics,
the selvage edge can be used as a true straight edge to measure into the
width of the fabric and mark for vertical cuts.
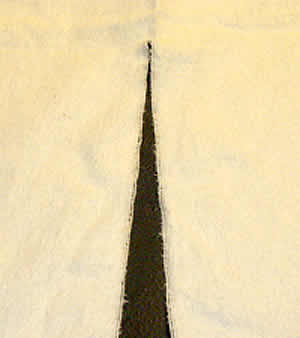
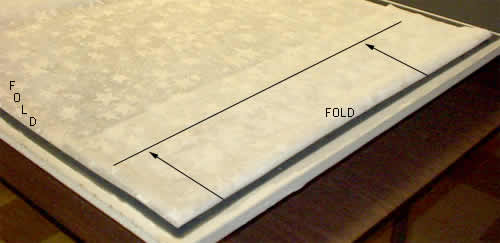
Fold the fabric to
obtain a straight edge.
Some fabrics defy all efforts to cut following a grain line or aligning
to a square table. These include laces which are too stretchy and/or slippery
to square to a table, embroidered sheers where the warp and weft have been
twisted, blackout and insulated linings with fused layers and heavy weight
upholsteries with fused backings. What you are doing here is establishing
a straight edge based on the fabric. The edge you achieve will look square,
but will not follow the thread line.
| When
all other methods fail, this one is very effective for cutting fabrics.
Fold the fabric in half lengthwise, aligning the two selvage edges.
Smooth flat. Fold the end of the fabric up about 10-12 inches, keeping
selvages and side fold line aligned. With all sides aligned the bottom
fold line is now a straight line. |
 |
| Measure
from the bottom fold up to the shortest point. Mark that measure across
the width of the folded fabric. Cut along that line. This gives you
a straight edge. You can now cut shorter valance pieces by measuring
from the cut edge up and drawing a horizontal line across the fabric.
To cut a long width of fabric, fold the bottom of the fabric up one
half the finished measure of the required cut. Measure from the fold
to the edge of the fabric along the width of the fabric. |
This method should be
chosen as a last resort. The fabric is cut based on where it wants to fold
and smooth, therefore you will probably be off grain, sometimes by quite a
bit. The fact that the fabric wants to be this shape may aid you in that it
will handle with little trouble despite being off grain. It is a satisfactory
method for cutting large pieces in workrooms which do not have a large table
space on which to work.
Deciding which technique
to use:
For the most part, I have
listed the techniques in the the order in which fabric can be cut as close to
the straight of grain as possible. I mentally follow this list every time I
begin work on a new fabric. My personal feeling is that cutting on the straight
of grain, while it may be a bit slower than squaring to a table, pays back later
in the fabrication process and installation. When you know for sure the pieces
of panels, valances, jabots, and shades are cut square, the pinning and assembling
is so much easier. You can hem sides and bottoms and align edges with confidence
that they will hang straight and true. Swags will hang perfectly symmetrical.
Even bias cut swags will hang just a bit askew if the piece from which they
were cut was not squared properly. This can be adjusted, but the time you saved
at cutting is now lost during fabrication.
Conclusion:
I highly recommend studying
and practicing each one of the techniques described above. It is my feeling
that 90% of the quality in each job is established at the cutting stage. If
the treatment is not cut and squared properly, a cascading series of problems
will occur as it is assembled, and no amount of dressing at installation will
make it hang perfect. However, any workroom which understands how to cut and
square properly at the first step will find that the entire fabrication flows
smoother with more consistent quality in the end product. .
If you enjoyed this article, you might enjoy:
Fearless Pattern Repeats - Part 1 - Basics of pattern matching and handling various types of repeats.
Fearless Pattern Repeats - Part 2 - all about stripes & plaids
Half-Drop & Drop Match Repeats
Cutting Techniques
Squaring Fabric
Return to the Sew Easy Windows articles Table of Contents page.
|