|
SCARF SWAG:
 |
|
Also know as
a Throw Swag, the Scarf Swag is a relatively simple treatment. It
is basically one long piece of fabric which is folded and draped
to form a swag and tails. Standard instructions for mounting this
treatment will have you accordian fold the fabric, drape it over
the holdbacks and pull on the center folds to form the swag shape.
This method is time consuming, frustrating, rarely results in a
neat swag and cannot be touched for cleaning.
This article
will teach you the components of a scarf swag. Once understood,
you will be able to fold a scarf swag into perfect pleats in one
step, pattern a treatment with multiple swags on one continuous
piece of fabric, plan for specific drop lengths on the tails - including
asymmetrical applications, and fold a ready-made scarf swag perfectly.
|
|
|
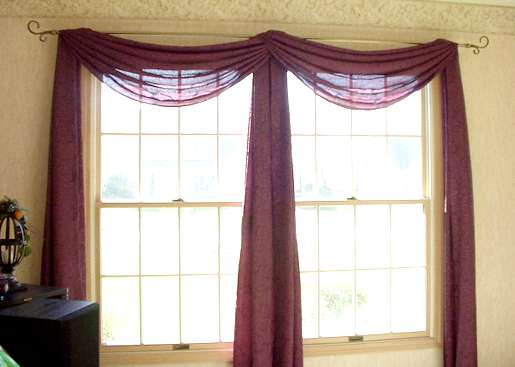
Note: The pictures used
in the article were taken when I hung ready-made scarves for a client. They
are unlined, and each window has its own full scarf. This was done on-site
so I could not do any formal stitching.
Determining Pattern Dimensions:
Before building your pattern
or cutting the fabric, you must determine the finished dimensions of the treatment:
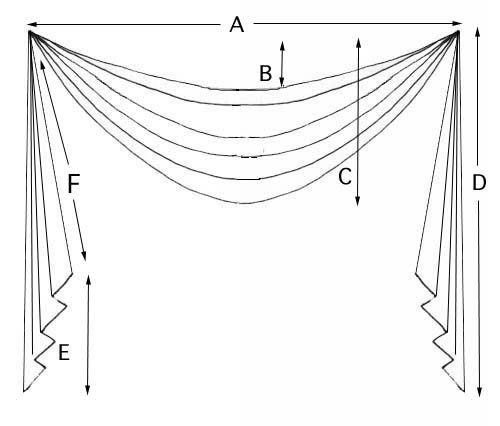 |
A - Finished face
width of the swag. Measure from the center of each holdback.
B - Cutout drop
on the swag. This is the measure from the top of the treatment
to the bottom of the swag cutout. If the swag is to be designed
with a straight top, your cutout measure would be zero.
C - Finished drop
length of the swag. This is the measure from the top of the treatment
to the bottom of the swag.
D - Finished drop
length of the tails. This is the measure from the top of the treatment
to the bottom of the tails.
E - Slant depth
of the tails. This is the measure of the drop from the inside
line of the tail to the bottom of the tail.
F - Leading edge
of tails.
|
Fullness. Because the
swag is pleated from one long scarf of fabric, it defies some of the basic
rules of fabricating soft swags. The swag portion of this treatment is hung
on the straight of grain and has no curve cut into the bottom line. As a result,
the folds do not hang well and tend to kink. Therefore, you would be wise
to plan on 1.5 - 2 times fullness for most fabrics.
Later, under Scarfswag
Options & Variables, we will discuss how to manipulate fullness, the
dimensions of the slant dept, asymmetrical variations, multiple swags on one
treatment and contrast lining in the tails.
Fabricating
the finished scarf:
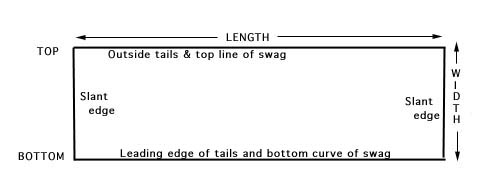
Cutting
dimensions:
The scarf swag is simply
one long piece of fabric finished to specific dimensions, then pleated into
a swag shape.
Cut length of the fabric:
Sum of both tails 2(D) + Finished width of treatment (A) + Cutout depth
(B) + 2 inches ( seams & ease).
Note:
Computing the finished width (A) + Cutout depth (B) is a simplistic
method for determining the cut length of the swag top. If the fabric
you are working with is stiff or stretchy it could affect the cutout
depth by making it too high or too low. If you wish to obtain an exact
measure, use the fabric itself. Pin the selvage edge of the fabric to
your board in the exact cutout and finished width you desire. Measure
the selvage edge between your pins for a perfect measure. Use this method
to determine the bottom curve width of the swag also.
Cut width of the fabric:
Can be one of three options:
1. Full width of fabric
seamed with full width of lining or finished on four sides with a scant
rolled hem. A standard 54" width of fabric will provide a finished
width of 50+", giving 2.5 - 3 times fullness to a swag 16 - 18"
in depth. Even with very soft fabric, the folds will be crowded and will
kink.
2. Full width of fabric,
folded in half lengthwise and seamed on three sides. Folded edge would
be the bottom line of the finished swag. A standard 54" width of
fabric will provide 25+", giving a 1.5 - 2 times fullness to a swag
12 - 14" in depth.
3. Full width of fabric,
trimmed to desired fullness, depending on finished drop length of swag.
Two widths of fabric can be seamed together lengthwise to increase the
fullness of a longer swag, but care must be taken to make sure the swag
is full enough to hide the shadow of a horizontal seam and the seam is
pleated towards the back of the swag. If trimmed or seamed to a specific
width/fullness, the scarf can then be finished either with a matched lining
or a scant rolled hem on all four sides.
Finishing the scarf:
The scarf can be finished
in one of several ways:
If using a full width
of fabric and the selvage edges are neat and clean, they can be used as
finished edges. Simply sew a scant rolled hem on each of the two ends.
Sew a scant rolled
hem on all four sides. Please note that the tails will show some of the
back of the fabric along the slant edge. If the back of the fabric is
as nice as the front, this will be a satisfactory finish. Otherwise, you
should line the treatment.
Line the entire treatment
with plain lining or a contrast fabric. Simply cut the lining 1/4"
smaller than the face fabric all around to prevent the lining from rolling
to the front of the finished treatment. Sew around on all four sides,
leaving a 6" opening on the top edge. Clip corners, turn and press
flat. Later, under Scarfswag Options
& Variables, we will discuss how to put standard lining in the
body of the swag and contrast lining in the tails.
Trim can be added
to the swag during the finishing process. If unlined, the trim can be
topstiched on the face of the fabric. If lined, the trim can either be
encased in the seam or topstitched on the face of the scarf after it has
been sewn, turned and pressed. Attach trim at the top corner, down the
side, across the bottom and up the other side. You can cut a gentle curve
into the bottom corner for a softer look.
Marking
and Pleating The Swag:
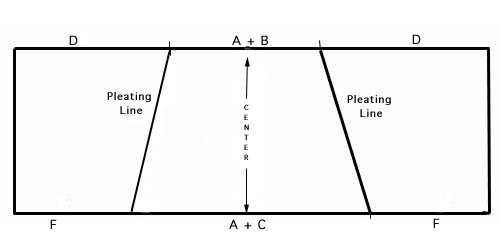
The secret to an easy
scarf swag is drawing the swag shape and pleating it in a perfectly symmetrical
shape.
Find the center of your
scarf. At the top of the scarf, mark the points, balanced off the center,
for the top width of the swag. This measure is either the sum of A+B or
the result of pinning the fabric to the board as noted under "Cutting
Dimensions."
At the bottom of the
scarf, mark the points, balanced off the center, for the bottom curve width
of the swag. This measure is either the sum of A+C or the result of pinning
the fabric to the board as noted under "Cutting Dimensions."
Using tailor's chalk
or non-permanent ink, draw two pleating lines, connecting the top of the
swag to the bottom. These will be your pleating lines.
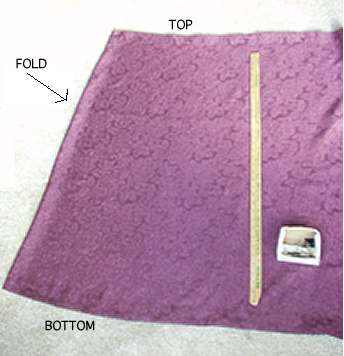 |
This is a rough
picture. But it shows a scarf folded in half lengthwise on the floor.
The bottom edge looks curved, but it is actually straight.
The ruler shows
the slant line. It points to the measure at the top for the top width
of the swag and the measure at the bottom for the bottom curve of the
swag.
In most cases, your
pleat line will not be a drastic slant, with a difference of less than
six inches between the top and bottom.
|
Optional step: For lined
swags and/or those which need to be pleated very carefully, I would recommend
laying the scarf flat, pinning through all layers of both pleating lines
very securely and sewing a straight line along the pleating line. This serves
two purposes:
-- It creates a line
on the front and back of the fabric to follow when pleating, thereby ensuring
that all the pleats are perfectly aligned.
-- It helps to secure
the lining in the tails and helps to prevent the lining/contrast from
rolling forward toward the front.
To mark the pleats,
measure the pleating lines. Most swags work best with 6 - 7 inches in each
pleat. Divide the pleating lines by 6 and/or 7. The answer will be the number
of pleats in your finished swag. Choose the one which most closely fits
your pleating line. Starting from the bottom of the each pleating line,
divide the line into 3 - 3.5" spaces. Make slight adjustments to each
pleat to accomodate the actual measure. You can have up to 1/2" more
in the bottom fold and 1/2" less in the top fold than the others if
necessary. Both pleating lines should be marked exactly the same. You must
have an even number of spaces on each pleating line.
Start with the bottom
and fold the first pleat towards the back. Accordian fold the pleats, following
your marks and aligning the stitching lines on top and back of fabric. The
top fold should fold towards the back. Turn the stack over and use an appropriate
sized safety pin to pin the back of the folds together. Do no catch the
top fold in this pin. It should be allowed to float free. Do the same with
the other pleating line.
 |
 |
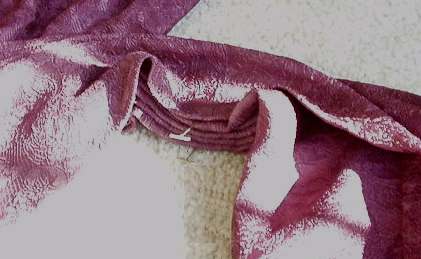
| In
this treatment, I marked the top and bottom edges with t-pins and the
pleats with straight pins. I pleat along the slant edge. Once done, the
t-pins lined up perfectly at the back of the treatment. The straight pins
- which cannot be seen - lined up perfectly on the front of the folds. |
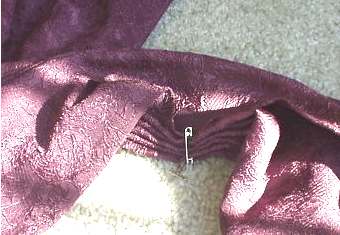
After pleating,
I used a safety pin to catch the folds of the pleats at the back of
the treatment. The bottom fold is shown here at the top. The top fold
is not caught in the safety pin.
|
Lay the scarf over the
holdbacks. The safety pins should lay to the back of the treatment on top
of the holdbacks, but can be pushed up to an inch to the left or right to
increase or decrease the center drop length. The swag should fall into shape
immediately with only minimal dressing. The tails will also fall into shape
easily. The tails will probably have one less fold than the swag. That fold
will disappear as you are dressing them. Do not fight the folds on the tails,
but let them dictate how they will fall.
CONCLUSION:
Once you have studied
and understand the components of the scarf swag, you will be able to design
and fabricate scarf swags with ease. Take for example the two following pictures
|
 |
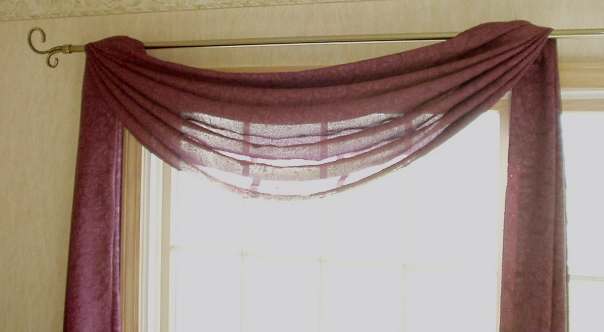
These are four separate
throw swags. They were ready-made scarves the client had purchased but was
unable to hang herself. She had mounted the two rods. In just a little over
two hours I met the new client, unloaded my tools and ladder, examined the
scarves and windows for the first time (the windows were different sizes
between the two rooms), measured, pleated and hung the scarves with the
same drop lengths - taking pictures at different steps along the way, packed
up my supplies, and collected payment.
The scarves were hung
so that the swag was pleated in the center for full panels on both sides.
They are laid over a pole instead of through holdbacks. Double-sided sticky
tape helps to stablize the edges on the poles. Otherwise they would slip
around. Also, the placement of the brackets at the corner of the window
and center of the window helped to stabilize the treatments. Safety pins
secured the treatment to the bracket.
The burgundy scarves
came to just floor length. Because the windows in the other room were narrower,
the scarves puddled on the floor. The client later tied them up as bishop
sleeves. The pleats in the scarves are secured with safety pins. Because
these are draped over a pole and over each other, rehanging them after cleaning
will present a small challenge. However, as long as the safety pins are
left in the pleats, the scarves will retain their swag shape.
You have mastered the
basic scarf swag. But now the design calls for more than one swag, asymmetrical
tails or some other variation. Scarf
Swags - Options & Variables will show you how to adapt the basic design
to many different variations.
A FINAL
WORD:
This article was written
to assist you in marking and pleating a scarf swag for a smooth installation.
For more detailed information
on how to manipulate a scarf swag, consider ordering The
Professional Workroom Handbook of Swags, Volume 1. The chapter on scarf
swags gives more detail than is contained in this article. It contains information
on mounting options as well as pictures and diagrams to aid your understanding.
This book is a valuable resource for new and veteran workrooms alike. It takes
the guesswork out of scarfswags.
Return to the Sew Easy Windows articles Table of Contents page.
|