|
The Perfect Swag:
Options & Variables
Swags come in many
different shapes and sizes. Understanding exactly how the different parts
of the pattern contribute to the finished swag will give you the ability
to tailor each and every swag pattern to the desired results.
General Rules:
Pattern material.
Use lining to
make your patterns. It drapes better than muslin and is relatively
inexpensive. As you develop proficiency, your pattern can then
be incorporated into lining the finished product - no waste.
Bias cuts versus
straight cuts.
Whenever possible,
cut the face fabric for the swags on the bias. This softens
the draping of the swag folds.
Always cut the
lining and interlining for small to medium swags on the bias.
Even if the face fabric is cut on the straight of grain, the bias
cut of the lining and interlining will help to soften the finished
folds.
Exceptions for
cutting on the bias:
1. Extra wide
or extra long swags. Swags which are over 54" wide and/or
25" long. Larger swags cut on the bias require piecing
of fabric where the pattern is wider than the fabric. On oversized swags,
this piecing will cause a seam line to cross too close to the center
point of the swag.
2. Striped or
plaid fabrics, or fabrics with an obvious horizontal or vertical
line. Cutting on the bias will turn the lines of the fabric
on a diagonal slant. In some cases, this look is acceptable. However,
it is usually not recommended.
|
|
Basic
Swag Shape:
|
Basic
Pattern Shape:
|
 |
|
DETERMINING PATTERN DIMENSIONS:
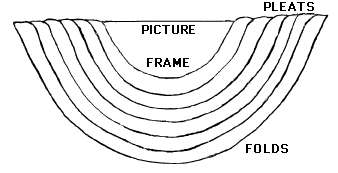
Top Width of Pattern:
The top width of the
picture on the swag is the top width of the swag pattern. Visualize
the finished swag. Determine how wide the picture will be in relation to
the finished width of the swag.
Example:
 |
 |
 |
| This
picture is 1/2 of the finished width of the swag. If the finished width
is 40", the top of the swag pattern would be 20." For
most swags, 1/2 would be your default. |
This picture is
1/3 of the finished width of the swag. If the finished
width is 40", the top of the swag pattern would be 13."
|
This picture is
2/3 of the finished width of the swag. If the finished width is 40",
the top of the pattern would be 27".
|
Some considerations
when determining the top width of the pattern:
You should be aware
that the fullness of the finished swag (the cut length of the pattern)
should be taken into account when choosing the width of the top of the
pattern:
If you choose
a narrow picture (second illustration), the pleats have to make up
the rest of the finished width. The pattern length should be very
full in order to have enough pleats to spread across for finished
width.
If you choose
a wide picture (third illustration), the pleats will stack heavily
on each other. This could create bulk at the ends of the swag. Keep
the fullness to two times or less to reduce the bulk.
Length
of pattern:
The length of the
pattern determines how full the swag will be. The fullness is distributed
in the swag between the picture and the folds. There are several points
to consider in determining fullness:
Most treatments
will follow a standard of two times fullness plus 4." Multiply
the desired drop length of the swag by 2 and add 4."
Light-weight,
silky or sheer fabrics look better with more fullness. The pattern
length can be cut 3-4 times the desired drop length - if cut on the
bias.
A soft, medium
weight fabric which can be cut on the bias and drapes well can be
cut 2 1/2 times the finished drop plus 4."
Stiff fabrics,
or those cut on the straight of grain will tend to kink or dimple
in the folds on the front of the swag. With these fabrics, stay with
the 2 times plus 4" standard fullness.
When in doubt,
always cut the swag pattern longer. A pattern can be cut down if too
full, but cannot be added to if too skimpy.
Bottom curve of
pattern:
The curve along the
bottom edge of a swag is a catenary. That is, the shape of a perfectly
flexible chain which is suspended by its ends and acted on by gravity.
It is not perfectly oval or eliptical. Therefore, a standard template
cannot be applied to the pattern of different sizes and shapes of swags.
Cutting the bottom
curve on your pattern is an art. It has two characteristics, rise and
center point, which determine how the bottom fold of the swag will hang.
Because every swag is unique in shape and fullness, there is no hard and
fast rule for drawing the bottom curve. However, the following guidelines
and defaults should help you experiment for the finished look you want.
Rise:
The rise is how
far the curve rises from the longest point of the pattern to the outside
edge.
If the rise is
cut too high, the bottom fold of the swag will be too large and will
hang down away from the swag instead of tucking in neatly. Cutting
a rise 2-3" too high is a design option which you can use to
highlight a trim or banding on the bottom of the last fold.
If the rise is
but too low, the bottom fold will not be incomplete or very small
looking in relation to the other folds on the swag.
For swags which
are a perfect half circle (the length is 1/2 the width), the rise
should be cut as 1/2 the finished length. If the swag is to be 16"
long, the bottom curve should rise 8".
The rise is tied
into the finished shape of the swag. If the swag shape is very wide
and shallow, the bottom curve is gentle and arches gently up toward
the board. Therefore, a lower rise should be cut in the pattern. If
the swag is very long and narrow, the bottom curve is very pronounced.
A higher rise should be cut into the pattern.
The book, The
Professional Workroom Handbook of Swags, Volume 1, contains detailed
instructions for troubleshooting the bottom curve of a swag. It also
contains a table in the Appendices which calculates the proper rise
for a swag based on its finished length and width. Using this table
will eliminate the guesswork of cutting a proper rise.
Center Point:
The center point
of the bottom curve works with the height of the rise to shape the
last fold at the center of the swag. When drawing the pattern, the
closer to the center point that the curve begins to rise, the more
the last fold will hang downward at the center.The farther from the
center point the curve begins to rise, the more that last fold will
tuck up. This is a subtle difference, but helpful in drawing the final
curve.
 |
 |
 |
| The
finished width of the swag determines how much of the bottom curve remains
flat before it begins to rise. The bottom curve should remain flat for
20% of the finished width of the swag. If the swag is to be 40" wide,
the bottom curve must stay flat for 8" in the center. This gives
the swag a nicely rounded look along the bottom curve. |
If the flat section
of the bottom curve is cut and inch or so wider than 20% of the finished
width of the swag, the last fold will hang downward and be wider at
the bottom, thereby showing off contrast banding or decorative trim.
.
|
If
you cut the bottom curve with a rise that is 2-3" too high, and bring
the bottom curve to a point in the center,this will result in a point
in the center of the last fold of the swag from which a tassel can be
hung. An informal and creative option to the tailored swag. |
Once the bottom curve
and rise have been established, you must draw a line to connect them. This
line should have a very gentle curve with no obvious angles. If the curve
is too pronounced, the last fold of the swag will swerve inward at the point
it reaches the board. If cut too straight, the edge of the last fold will
have an angular look.
When in doubt, draw
the bottom curved line with an exaggerated curve. Once the pattern is pinned
to the board, you can trim the curve to the shape you desire. If the curve
is cut too straight, you cannot add to it.
For a pointed swag,
you will want a rise of at least 1/6th. Draw a straight line from the center
point to the rise.
Pattern sides:
Once the top width,
pattern length and bottom curve have been drawn, simply draw a line from
the edge of the top width to the end of the curve line for the swag sides.
MARKING
THE PATTERN
The sides of the pattern
are pleated to form the folds of a swag. Consider the following variations
when marking a pattern:
The first pleat forms
the picture on the swag:
A default of 5"
will usually give a nice picture. The narrower the swag, the larger
the picture a 5" pleat will make. The wider the swag, the smaller
the picture.
For a larger picture,
increase the first pleat in 1/2" increments until the desired picture
is obtained. For a smaller picture, decrease the first pleat in 1/2"
increments until the desired picture is obtained.
Always set the
first pleat on your pattern first. Its size will determine how much
fullness is left to distribute in the rest of the folds.
The last pleat forms
the 'return' on the swag. Mark this at 4" from the bottom. After
pleating the swag, you may wish to make this slightly larger or smaller
to adjust the last fold.
The space between
the first and last pleats are the folds for the swag.
Divide the space
between the first and last pleats into even segments which are as close
to 4.5" as possible. On most swags, it is important to keep all
of the pleats equal in size.
The following pictures
help to illustrate the relationship of the the number of pleats to the size
of the picture frame. They are pictures of one swag, pleated two different
ways. They are pleated to form a 35" wide swag with a 16" drop.
However, the number of pleats and the size of the picture differ between
them.
 |
 |
| This
swag was pleated with seven folds. This required making the picture
frame relatively small, thereby compressing the picture. The result
was a swag which was too busy looking. |
The
same swag, pleated with six folds and a slightly larger picture frame
looks much better. By reducing the number of folds by one, we still
keep the rich fullness, but the swag does not look as busy. |
A
FINAL WORD:
This article was written
to assist you in designing and building a truly custom swag. However, please
understand that this is not an exact science. Fabricating custom swags is
an art form. It requires patience and practice. The end result is always
worth the effort.
For more detailed information
on how to manipulate a swag pattern, consider ordering The
Professional Workroom Handbook of Swags, Volume 1. The chapters on Options
& Variables and Troubleshooting contain much more detail with pictures
and diagrams on the information given in this article. They also have information
on return options for swags and for reducing bulk at the pleat line. It
is a valuable source of reference for new and veteran workrooms alike.
Return to the Sew Easy Windows articles Table of Contents page.
|