|
The
Workroom Handbook of Swags, Volume 1
ADDENDUM
Writing this
book was a journey into uncharted territory. Learning and defining the engineering
concepts of swag patterns has never truly been attempted before. As such, I
am still learning new things every time I fabricate a swag. The purpose of this
page is to expand on the information found in the book, as well as clarify any
points which were confusing or ambiguous. I would also hope that you would contact
me about any information in the book which was either confusing or new and
interesting for you. I will be happy to discuss any questions you might have.
Contents:
*********************************************************************
Naming
Conventions
It was pointed out to
me that the names given the swags in my book do not follow the WCAA standards
as published in 2001. I did not have a copy of the standards at the time I
was writing. I knew they existed, though, and thought long and hard about
what names to give the swags described in the book. I chose the names to describe
the specific characteristics which make each of the three styles unique.
Basic Board Mount
Swag. This is the most basic and traditional shape. It is always mounted
on a hard flat surface. Perhaps, in retrospect, I should have called it
the Picture Swag because it is the style which features a picture area.
However, that name is far removed from anything familiar in the industry.
Basic Board Mount Swag is meant to create a mental picture of a traditional
board mount swag. The WCAA standards gives three different names to this
swag based on the finished picture width. The basic board mount is still
the same for each of them. The names only refer to different options available
for designing different looks:
 |
 |
 |
|
This
board mount swag has a very small picture area. WCAA names this the
Queen Anne Swag.
|
This
board mount swag has a picture area that is about 1/2 the finished
width of the swag. It is a nice balance of folds and picture. WCAA
names this the European Swag.
|
Finally,
this board mount swag has a very wide picture area with the pleats
stacked on narrow pleat allowances. The WCAA names this a Stacked
Swag.
|
Cutout Swag.
This is most commonly known as the Pole Swag and is named that in the WCAA
standards. The reason I did not specifically call it the pole swag in the
book, though, is because it may be hung on the face of a cornice board or
on individual boards under the pleat allowances to give the impression of
'floating swags.' In naming these Cutout Swags, I hoped to evoke a mental
picture of a Basic Board mount Swag which retains its pleat allowances,
but has the center picture area 'cut out'.
Point-to-Point Swag.
If you think typing that name over and over is easy, think again. It is
also known as a Drapery or Necklace swag because it is often paired with
a drapery panel. WCAA Standards have labeled it a Drapery Swag. Once again,
though, its use is more diverse than that. It can be hung with other similar
swags and no draperies. Its general shape is the basis for the scarf swag.
The Point-to-Point name is meant to evoke a mental picture of a swag with
no pleat allowances which is suspended from two ends.
The most basic reason
for my naming conventions is to help you look at a picture of a swag and be
able to define which swag style it is so that you can effectively draw the
best pattern. If it has a picture, it is a Board Mount Swag. If it does not
have a picture, but has pleat allowances, it is a Cutout Swag. If it has no
picture and no pleat allowances, it is a Point-to-Point swag.
Back to
top
*********************************************************************
Clarifying
the type of pattern this book will teach you to draw.
I don't think I clarified
in this book that everything in the book applies to swags which are hung on
a straight line. They do not apply to swags with one side mounted higher than
the other. Volume 2 addresses
the inherent differences in designing and drawing those patterns.
Also, this book does not
teach you how to cut the 'fingers' into the swag sides (the familiar 'Christmas
tree' swag pattern shape) which many swag patterns have. When working with
a custom swag, you need to have as much flexibility to pleat and troubleshoot
it as possible. Once fingers are cut into the sides, the swag loses its flexibility
and must be pleated following the fingers. However, you will find below instructions
on how to draw a pattern in the Christmas tree
shape.
Back to
top
*********************************************************************
Cutout
swag - pattern length
Page 6.5 of the book does
not properly clarify how to calculate the pattern length for cutout swags.
Under "E = Length of Pattern" it should read as follows:
The length of the pattern
gives the swag its fullness. An acceptable default is to draw the pattern
at 2x full. For cutout swags, the pattern length should be based on the body
of the swag itself. Body = Finished length minus cutout. If a cutout swag
is to be 18" long with a 6" cutout, the body of the swag will be
12" (18 - 6 = 12). When calculating the pattern length, multiply the
body of the swag by the desired fullness. If the same cutout swag is to be
2x full, the pattern length will be 26" ( ( 12
* 2 ) + 4 ).
Back to
top
*********************************************************************
Point-to-Point
swag - pattern length
Page 7.6 of the book does
not properly clarify how to calculate the pattern length for point-to-point
swags. Under "E = Length of Pattern" it should read as follows:
The length of the pattern
gives the swag its fullness. An acceptable default is to draw the pattern
at 2x full. For point-to-point swags, the pattern length should be based on
the body of the swag itself. Body = Finished length minus cutout. If a point-to-point
swag is to be 18" long with a 6" cutout, the body of the swag will
be 12" (18 - 6 = 12). When calculating the pattern length, multiply the
body of the swag by the desired fullness. If the same point-to-point swag
is to be 2x full, the pattern length will be 26" ((12 * 2 )+ 4 ).
Back to
top
*********************************************************************
Page
6.6
Under step 2, the first
pleat, I indicate that wider swags may need a first pleat of 1.5 - 2"
to give the first fold some depth. This is incorrect. I have learned since
that it is actually the opposite. The wider a cutout swag at the top, the
less you have to put in the first pleat. A six foot wide swag I patterned
recently had no first pleat. The top corners of each side were secured flat.
The top line of the swag draped into a nice fold automatically.
Also, a typographical
error shows step 4 missing. It is not missing, the steps are simply misnumbered.
Back to
top
*********************************************************************
Eliminating
raw edges at the back of the pleats
A concern from the first
volume on swags was the raw edges of the pleats that showed at the back of
most swags. Yet, the swags were admired for their lack of bulk at the board
line.
Ideally, a quality custom swag should not have exposed raw edges of fabric.
This is accomplished by cutting the pattern in a Christmas tree shape with
jagged sides, but at the cost of adding bulk on top of the board.
|
Drawing And Pleating
The Christmas Tree Shape:
1. Draw the pattern
as you normally do, but do not cut it out. This is the basic swag
pattern.
2. Next, add an
extension to the sides that acts as a 'board allowance' for the pattern.
Extend
the top line and bottom curve 3-4”. Draw a line connecting the
top and bottom. When in doubt, make the extension 2-3” larger
than you think you need. The excess is simply cut away after
pleating.
3. Cut the pattern,
open and lay flat on the table. Draw the pattern side on the other
half. Mark the pattern sides for pleats.
|
|
 |
4. Pleat the pattern.
Smooth the layers of fabric out of the way and pin the point of each
pleat at the board allowance. Troubleshoot the pattern.
|
|
 |
5. Unpin the pattern
and use it to cut the actual swag with straight sides. After sewing
and pressing the swag, draw the basic swag pattern on the face and
mark the pleats with with chalk or disappearing ink. Pleat the swag
the same way you pleated the pattern, smoothing the excess fabric
up and out of the way and aligning the pleat points with the board
allowance. Troubleshoot for minor imperfections.
By leaving the sides straight, you have the extra step of drawing
the pattern shape and managing the extra fabric on every swag in the
treatment. But you also have the flexibility of troubleshooting and/or
further customizing the swag if desired.
|
6. Draw a straight
line along the board allowance. While still pleated on the board,
cut the excess fabric away along this line. When unpinned, the pattern
has the jagged edges of predefined pleats (the familiar "Christmas
Tree" shape). Once cut, there is little flexibility for trouble-shooting
the finished swag. It is best to cut away the predefined pleats in
the finished swag instead of the pattern because the thickness of
the layered fabrics in a finished swag alters the dynamics of the
pleats.
|
|
 |
If there are multiple swags of the same size in the treatment, use
the first swag as a pattern to cut the predefined pleats in the other
swags.
7. Follow standard procedures to finish the swag.
|
Back to
top
*********************************************************************
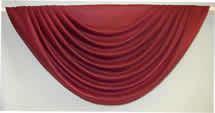
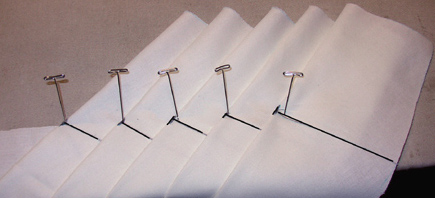
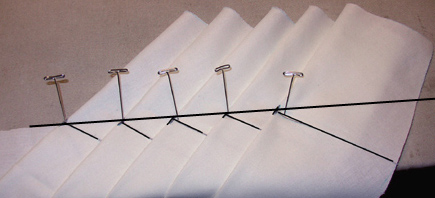
Fullness.
In the book, we show four
different pictures of swags illustrating four different fullnesses on half
circle swags. When making up sample swags for the class, I discovered an anomaly
inherent in unusual shaped swags and how they handle fullness. Study the two
swags below:
|
The above swag is
wide and short. It is 2x full. The swag to the right is long and narrow
and 1.5x full. Both are cut on the straight of grain. It seems that
how far apart the pleats are spread in the pleat allowance contributes
to how full the swag looks and how well it hangs.
In the photo above,
even though this swag is 2x full, it looks less full than the one on
the right. This is because its pleats are spread wide to cover a wide
portion of the board. If you are designing a swag which is wide and
short and your pleat allowance is going to require each pleat to cover
2-3" or more of space, you would do well to plan 2-3x fullness.
Always plan more than you think you may need. It is easier to cut it
away than to add it back on.
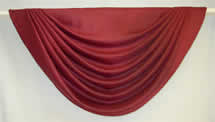
In the photo to
the left, even though this swag is only 1.5x full, it looks like more.
This is because the pleats are stacked heavily on each other and the
folds are close to each other. When planning a swag which is very long
in relation to the finished width, plan 2x fullness or less.
|
 |
Back to
top
*********************************************************************
Bottom
Curve and Rise.
In the book, I provide
a chart for calculating the bottom curve of the pattern based on the finished
length and width of the swag. The calculation for this chart is the Catenary
Curve formula, an established mathematical formula. This formula, when applied
to the finished width and length of a shade gives an answer that is slightly
too big for an actual swag pattern. This inaccuracy compounds for larger swags.
Each swag has a very specific
finished width and length, which results in a very specific bottom curve length.
When the pattern is drawn with the proper rise and bottom curve length, a
perfectly balanced swag is the result. What we have found is that, using the
catenary formula for drawing the bottom curve length causes you to draw a
bottom curve which is slightly longer than required. The swag does not pleat
into a properly balanced swag.
Therefore, the bottom
curve length chart in the book is very handy for calculating trim requirements
and fabric requirements. When drawing the pattern, though, it is best to use
the weight chain method to simulate the finished width and finished length
and measure that weight chain for an accurate bottom curve length. The resulting
swag has the exact finished dimensions.
Back to
top
*********************************************************************
Extra
Large Swags. Special considerations.
When defining the pattern
dimensions for an extra large swag, keep in mind some important points:
- Weight chain stretches.
If, when draping chain to simulate curves of the finished swag you feel
the chain is being stretched, switch to a heavy ribbon or cording that
will drape but not stretch. I have found that, when the weight chain stretches
while hanging, it relaxes when measured. This results in a bottom curve
that is too small and a finished length that is too short.
- If the swag is very
wide and short - an inverted eyebrow shape, the pleat allowances will
be spread over a wide area. Build extra fullness into the pattern length.
It can be removed if the swag is too full. A wide swag, like long panels,
needs extra fabric in each fold to hold its shape over the width of the
swag. Also, the wide pleat allowances need fullness in the swag in order
to have the fabric to pleat.
- The farther the pleat
allowances are away from each other and the longer the swag drapes between
the pleat allowances, the more likely the fabric layers (face, lining
and interlining) will separate across the face of the swag. The pinch
at the pleat allowances holds the layers together. The farther apart they
are, the less they control the layers. The combination of fabric types
also contribute to layers separating. Building extra fullness into the
swag as noted above will help to control separation. The more fabric in
each pleat, the more control the pleat has on the layers in the fold.
If your layers do separate, you can make discreet tacks in the face of
the swag as it is hanging at the back of the folds. Tack through all layers
with a coordinating thread
Back to
top
*********************************************************************
Saggy
Lining
In spite of your best
efforts, sometimes the lining will sag away from the swag and show on the
front of the swag. When pressing the bottom seam line, always favor the face
fabric to the back of the swag at least 1/4". In some cases, though,
the face fabric will refuse to crease and the weight of the fabric layers
will cause the lining to pull away from the face and sag below. Some suggestions
for fixing this:
Understitching.
After sewing the bottom curve seam, open the layers and lay flat on the
machine table, right side down. Smooth the seam allowance over to lay
on the lining. Topstitch 1/4" away from the seam through the seam
allowance and lining. You can opt to lay this wrong side down on the table
with the seam allowance smoothed under the lining and topstitch from the
right side of the lining. This attaches the seam allowance to the lining.
It is a proven dressmaker trick and does seem to help control the sagging
lining. Understitching is a very effective technique for many applications
on window treatments.
Hand tacking.
Depending on the texture of the face fabric, you might be able to tack
the lining to the face by hand from the lining side. Use large stitches,
burying the thread between the fabric layers and catching only a thread
or two of the face fabric with each stitch.
Trim. Topstitch
a decorative trim or braid to the bottom curve of the swag. The stitching
will help keep the lining intact.
Back to
top
*********************************************************************
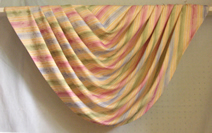
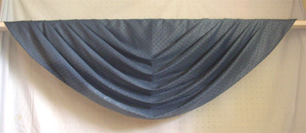
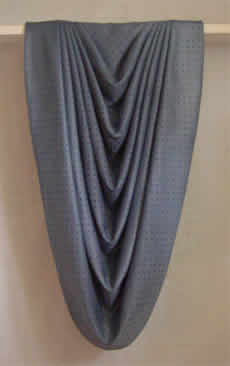
Cut
on the bias or straight?
Workrooms are often given
striped fabric from which to fabricate swags. The first question is always,
do I cut this on the bias or the straight of grain. For your information,
the following two pictures are striped swags, one cut on the bias and one
cut on the straight of grain.
|
|
|
| This
swag was cut on the straight of grain. The stripes tilt inwards from both
sides creating symmetry. It also does not want to drape quite as softly.
This is compensated by bringing the kink in each fold to the center of
the swag. |
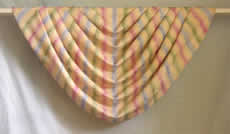
This
swag was cut on the bias. The stripes on one side tilt inwards. The stripes
on the other run straight up and down. This is a feature of a bias cut
stripe. It is an acceptable look and, with planning, could be set up in
an asymmetrical treatment of two windows. |
Back to
top
|