|
SQUARING FABRIC PIECES.
Blocking, squaring, straightening
- these terms are all synonymous to the technique of ensuring a fabric is properly
prepared for fabrication. That is, the warp and weft lines are perpendicular
to each other and a line cut following the weft thread is a straight line.
Symptoms of fabrics which
were not properly straightened:
Determining if a fabric
is off-square:
It is important, before
beginning a project, to know if or how much a fabric is off square. Cut the
leading edge of the fabric on the grainline using the most precise technique
for that fabric:
-- If a horizontal line
is woven into the pattern, cut along that line.
-- Or, pull a weft thread and cut along the pull line.
-- Or, if absolutely impossible to pull a thread, draw a line following the
printed pattern on the fabric.
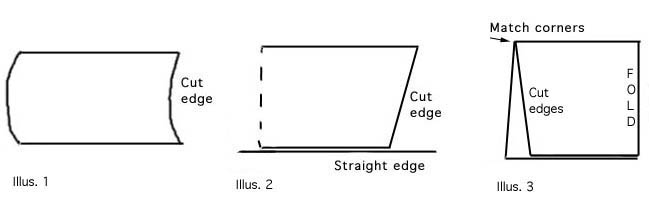
Sometimes, you can visually
see that a cut line is not straight. If the cut edge is curved (Illus 1), the
fabric was pulled thru harder on each side than in the center. Usually the cut
edge is slanted (Illus 2) because the fabric was pulled harder on one side than
the other. If the skewing is not readily noticeable, fold the fabric length
in half (Illus 3), aligning the corners and selvage edge on one side and let
hang. If the bottom corners do not come together, the fabric is not square.
Squaring techniques.
There are three methods by which you can square the fabric:
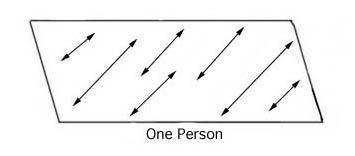
1. One person:
Grasp the fabric and pull at intervals across the length the fabric.
Fold the fabric in half lengthwise, matching the corners. If squared
to within acceptable limits, you are finished. Otherwise, repeat the
process.
|
 |
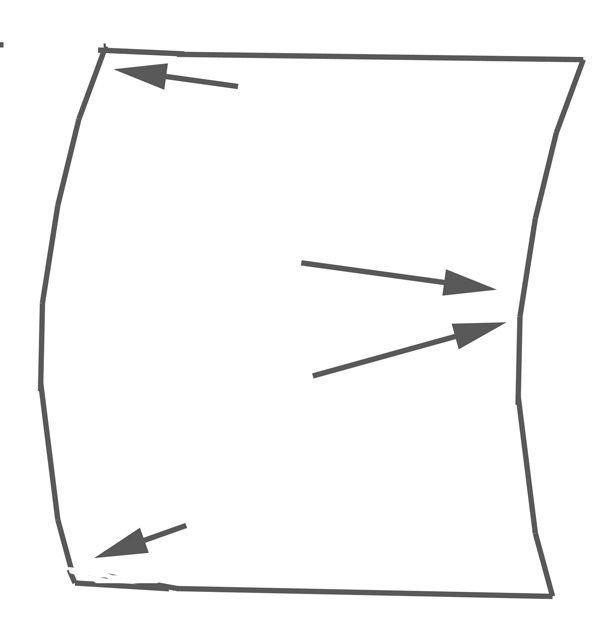
For concave fabrics, pull to block following these arrows.
|
|
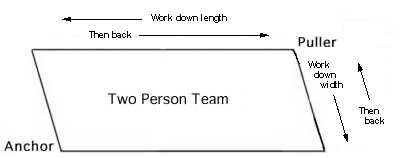
2. Two Person Team
For longer pieces
of fabric, it is best to have a second person. The second person will
act only as an anchor. They do not pull on the fabric, only provide
the stability.
|
|
There are several
reasons for using the second person as an anchor only: The puller
has complete control as to how much pull is exerted on the fabric;
Most fabrics don’t require the force of two people pulling; The
amount of pull will be more evenly distributed; Finally, the anchor
can be any kid or adult who happens to walk through the door - no
special training required.
With two people,
you will be pulling the fabric from the corners and along the edges,
thereby aligning all threads at one time. The anchor and puller each
grasp the fabric at diagonal corners (see the Two Person Team illustration).
The anchor braces and will not release the corner during this process.
The puller pulls firmly. You will see and feel the threads realign
themselves in the center of the fabric as you pull. Maintaining tension,
use a hand-over-hand motion to work your way down the length of the
fabric (the top of the illustration), grasping the fabric at 12-15"
intervals along the selvage edge. Return to the corner using the same
hand-over-hand motion and maintaining tension.
Continue to maintain
tension on the fabric. Using the same hand-over-hand motion, work
your way down the width of the fabric (the right side of the illustration)
grasping the cut edge of the fabric. Return to the corner using the
same technique and maintaining tension.
The reason for
working the tension on the fabric along the length and width of the
fabric is to straighten all the threads. Conventional teaching in
home-ec had us pulling only on the diagonal corners. This worked to
some degree, but only served to straighten the threads in the center
of the fabric. Pulling along the edges pulls the threads into alignment
throughout the cut piece.
Fold the fabric
in half lengthwise and check the corners. If squared to within acceptable
limits, you are finished. Otherwise, repeat the process.
|
3. Blocking on
the table:
This technique requires
a full-size workroom table. They are generally five feet wide by 8 or more
feet long. They are padded and framed with ruled sides. To block a stubborn
fabric using the table, lay it out flat on the table, aligning the selvage
edges with the side of the table. Clamp or pin one end of the fabric to
the table. You will have to pull the fabric so that the end of it is aligned
with the end of the table. It is very important to clamp or pin the fabric
closely to offset the tension you will be putting on it. If the fabric is
a loose weave which might tear away or fray, turn the first 2" under
and pin through both layers for increased stability.
At this point, if the
fabric will tolerate liquid, you can spritz it down liberally with distilled
water. The water relaxes the threads so it can be pulled. Take the other
side of the fabric and pull firmly, aligning it to the other end of the
table. Pin or clamp down securely. Steam the entire piece. Allow to dry,
then unpin from the table.
This is probably the
most effective treatment for straightening your fabric, but it does have
a couple of downsides: You must have a professional workroom table. The
fabric must tolerate steam and liquid. There is a possibility of uneven
shrinkage due to the steam and water which is applied. Until the fabric
dries, it will tie up your table for other projects.
Stubborn fabrics:
Many fabrics today are
treated with finishes and heat which lock the threads in position and resist
squaring. In some cases, you will have to exert quite a bit of tension on
the fabric to pull it into alignment.
Cut away the selvage edge.
Sometimes this edge will prevent the fabric from squaring up properly.
Some fabrics, if they
can be treated with water, will respond very well to the squaring technique
if thoroughly spritzed with distilled water. The water relaxes the threads,
allowing them to be realigned.
Fabrics which have been
treated with a rubberized backing (insulated and blackout linings, upholstery
fabrics, etc) cannot be straightened. The backing prevents this. The upside
here, though, is that they will hang square to their own selvage edges, regardless
of the warp and weft lines. This is because the backing stabilizes the fabric.
Do not try to cut on the straight of grain or block these fabrics. Simply
square to your cutting table or us the T- or L-square to draw your cutting
lines.
Finally, there are fabrics
which will not square at all or within acceptable limits. If you suspect a
fabric to be especially resistant to squaring, let it sit overnight to determine
if it readjusts itself out of alignment. If so, it must be rejected
Acceptable Limits:
Depending on the job,
there are various levels of acceptable limits:
Roman shades, soft cornices,
any valance with flat, squared sections must use fabric which is squared
to within one half of an inch. It is imperative they hang flat. Lining must
square to same limits.
Long panels, swagged
treatments, folded (jabots) treatments can work with fabrics which are squared
to within two inches. The closer they are to square, the better they will
work, but you do have some play here.
Unlined, unconstructed
treatments, puddled panels, scarf swags, etc. can usually be fabricated
without worrying about squaring.
Conclusion:
Squaring fabric is becoming
a lost art. Many new sewers are unaware of the importance of working with squared
pieces. When combined with a practice of cutting as close to the straight of
grain as the fabric and pattern will allow, you will ensure much easier fabrication,
installation and dressing of your treatments.
If you enjoyed this article, you might enjoy:
Fearless Pattern Repeats - Part 1 - Basics of pattern matching and handling various types of repeats.
Fearless Pattern Repeats - Part 2 - all about stripes & plaids
Half-Drop & Drop Match Repeats
Cutting Techniques
Squaring Fabric
Return to the Sew Easy Windows articles Table of Contents page.
|