| The
Basic Swag Pattern
Swags
come in many different shapes and sizes. Yet the basic shape of the pattern
and the method of pleating varies little between swags.
This
article takes you step by step through the process of making a simple
swag pattern, 40 inches wide by 18 inches long. It includes diagrams and
pictures. It is important to learn the basic swag shape and how it is
pleated. For the purpose of this article, I use standard defaults for
designing a swag pattern.
Symbol Guide
For computations,
this article uses the following math symbols:
 |
+ |
Add |
|
| |
- |
Subtract |
|
| |
x |
Multiply |
|
| |
/ |
Divide |
|
| |
= |
Equals |
|
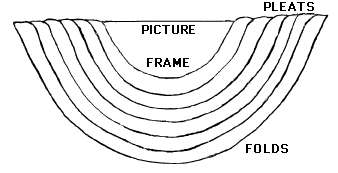
Identifying
the different parts of a finished swag:
The
center of a finished swag is the 'picture.' It showcases a motif on the
fabric. The first fold on the swag acts as the picture frame. The frame
can be adjusted to maximize the picture in the swag.
The
sides of the swag pattern are pleated into folds which are secured to
the top of the board or pole. The pleats each form a fold on the front
of the swag. Optimally, the folds should be equally spaced down the front
of the swag. Always check the folds on the back of the swag - they should
also be equally spaced to present a quality product from the street side
of the window. |
Drawing
the swag pattern:
|
Finished
Dimensions:
You must know the
dimensions of the finished swag before attempting to draw the pattern.
A = Finished width
is the full width of the swag when mounted at the board or pole line.
B = Finished length
is the longest point of the swag, measured from the center of the board
or pole line to the bottom of the swag.
|
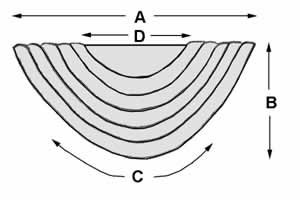 |
C = Bottom curve
length is the catenary curve of the swag from the board line, down to
the longest point and up to the board line. To obtain this measure:
Drape a length
of weight chain from one end of the finished treatment to the other.
Hold the chain on top of the board at each end at the point where
the fabric will end. This will give you a finished curve length which
includes the board allowance. Measure the length of the weight chain
and that will be your bottom curve length.
D = Top width of
the swag picture. This is also the top width of the swag pattern.
For our sample swag,
the finished width will be 40", the finished length will be 18"
and the bottom curve length will be 60".
|
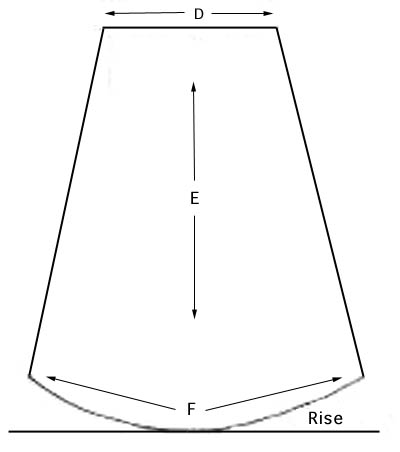
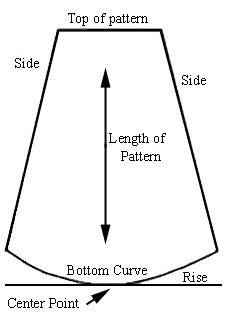
D
= Width of top of pattern. For most swags, you will draw the pattern
width at 1/2 the finished width.
Our sample swag is 40" wide finished, therefore the pattern will
be drawn with a 20" wide top width.
E
= Length of pattern. For most swags, you will draw the pattern length
at two times the finished drop length. Always add 4" to your length.
Our finished sample swag wil be 18" long. Therefore, the pattern
must be drawn 40" long {(18 x 2) + 4}.
C
= Bottom curve length of pattern. Our sample swag of 40" wide by
18" long will have a curve length of 60".
Rise
= The distance the curve line rises above the bottom edge of the pattern.
Swags which are 1/2 circles (length is 1/2 width), the rise is 1/2 the
finished length.
For
our sample swag, the rise will be 9". |
 |
|
|
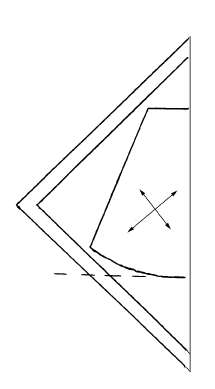
Cutting
the Pattern:
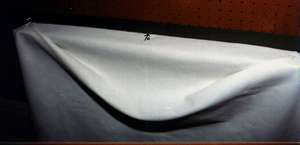
Fold
the lining diagonally as shown. Measure out 1/2 of the pattern from the
fold line of the fabric.
Mark
the straight of grain.
Cut
|
|
|
Marking
the Pattern:
Open
flat and mark the center of the top edge.
Mark
the pleats as follows:
- 5"
from the top for first pleat. This will determine your picture size.
- 4"
up from the bottom.
- Divide
the space between the first and last pleat into equal pleats of 4-6".
All
of the pleats between the first and last must be equal in size.
|
 |
|
Pleating
The Swag Pattern:
Use
a covered board, preferably the one on which it will be mounted. Mark
the center of the board. |
|
Pin
the top edge of the pattern 2" up on the top of the board, aligning
the center marks.
Pleat
the first fold, right side and left side. Align point of the pleat along
the edge of the top of the pattern.
This
first fold sets the 'picture' on your swag. |
 |
|
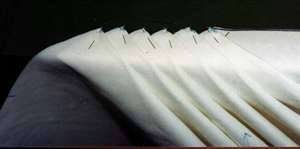
Continue
pleating all but the last fold.
The
distances between the pleats and the angle at which they fall off the
board should be equal for all pleats. Pleat the left side exactly the
same as the right. |
 |
|
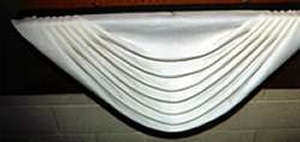
Pleat
the last fold. You will also have to take the end of it and pull it up
onto the board to secure. This will cause the bottom edge of the swag
to tuck neatly up. This last pleat can be wider than the finished width
by 1/2" on each side. This is your seam allowance for the finished
swag. |
 |
This article gives
you only the bare bones of drawing a swag pattern for a board mounted swag.
The dimensions it gives are for a very specific size of swag. The swag pattern
is a marvel of engineering whereby the flat cut of the pattern can be transformed
into a three-dimensional curved swag.
|
The top of pattern
sets the picture area width and general shape of the swag.
The length of the
pattern and the pleated sides combine to give the swag its character.
The length of the pattern determines the fullness of the swag. The sides
are pleated into folds which distribute the fullness and give the swag
visual interest.
The bottom curve,
center point and rise combine to define the shape of the lower edge of
the swag and the distribution of the folds. |
 |
This article also only touched
on the board mounted swag. The Cutout Swag (aka Pole Swag) and Point-to-Point
(aka Drapery) Swags are variations of the basic board mount swag. These three
styles of swags are the basic building blocks for all other swags - Arched,
Turban, Kingstons, Empires, Turban, Boxed, Swagged panels and so on. Once you
have mastered these three and understand the relationship of pattern components
to the finished swag, you will be able to adjust and troubleshoot most any swagged
treatment with more ease.
If you wish to learn more
about the engineering properties of the swag pattern, consider ordering the
book "The Professional
Workroom Handbook of Swags, Volume 1."
Return to the Sew Easy Windows articles Table of Contents page.
|